25 Magical Winter Wonderland Birthday Party Ideas (Budget-Friendly!)
Snowy days have a quiet kind of magic. The house feels cozy, cheeks go rosy, and little feet race to the window to watch the flakes. Now picture that same sparkle inside your home: twinkling lights, fluffy “snow,” and your child gasping as they step into a room that looks like their favorite storybook. That feeling sits at the heart of the best winter wonderland birthday party ideas.
Many parents feel pressure to throw picture‑perfect parties. Add cold weather, limited indoor space, and a careful budget, and stress climbs fast. Social feeds full of over‑the‑top winter wonderland setups can make it seem as if you need expensive rentals, character entertainers, and custom decor for your child to feel special.
The good news is that a winter birthday comes with its own built‑in charm. Cozy socks, hot cocoa, and glittering snowflake decorations give you lots of room for creativity without spending much. With smart planning, simple DIY winter party decor, and one or two planned splurges, you can create a party that feels magical for kids and manageable for you.
This guide walks through twenty‑five budget‑friendly winter wonderland birthday party ideas for decorations, food, activities, and favors. You will see how small touches, affordable projects, and digital invitations from Layer7 Designs fit together. By the end, you will have a clear plan to turn your living room or backyard into a sparkling scene your child will remember for years.
“Play is the work of the child.”
— Maria Montessori
Key Takeaways
- You do not need a huge budget for a winter wonderland birthday party; a short list of priorities and a couple of simple DIY projects go a long way.
- A tight color palette of whites, silvers, soft blues, and maybe a touch of pink or purple makes even basic supplies look planned and cohesive.
- Recyclable materials such as cardboard, egg cartons, and glass jars can become beautiful winter decorations, keep kids busy, and double as decor and take‑home gifts.
- Interactive ideas like craft tables, decorate‑your‑own treats, and indoor winter party games keep children engaged and reduce the need for outside entertainment.
- Digital winter wonderland invitations from Layer7 Designs cost far less than printed sets, set the tone for the theme, and free more of the budget for food, decor, and memories.
Planning Your Winter Wonderland Party Timeline and Budget
A bit of structure makes planning a winter wonderland theme party far less stressful. Cold weather, holiday schedules, and smaller indoor spaces make timing and headcount especially important, so a basic timeline and budget keep last‑minute chaos away.
Start by deciding how many guests you feel ready to host. Ten to fifteen people often fit well in a modest living room, while twenty to thirty may work better in a rented room or community space. Think about where you want to spend the most: many parents put most of the budget into food and one or two statement winter wonderland decorations, then keep everything else simple.
Build a simple budget that covers:
- Invitations – for example, a Layer7 Designs digital template (often about $5–$10 for unlimited sends)
- Decorations
- Food and cake
- Activities and favors
Use a shared notes app, a small spreadsheet, or a Pinterest board to track ideas, links, and costs in one place. Treat this section as a starting point, then adjust it to match your own winter wonderland birthday party ideas.
Essential Party Planning Checklist
Work backward from party day so you have time for shipping, craft drying, and guest replies:
- 6–8 weeks before:
Pick the exact winter theme and color palette, decide on home vs. venue, create your guest list, and choose a Layer7 Designs invitation template so wording and style feel settled. - 4–6 weeks before:
Edit and send your digital invitation by text, email, or private event page. Plan the menu (including allergy‑friendly options) and order any special items like themed plates or a cake stand. - 3–4 weeks before:
Track RSVPs and gently remind anyone who has not answered. Buy non‑perishable decorations and craft supplies for DIY winter party decor, and sketch out activities and where they will happen. - 2 weeks before:
Finalize the menu and begin larger projects such as a cardboard castle or egg carton snowflakes. Confirm which friends or family members can help with games, food, and photos. - 1 week before:
Shop for shelf‑stable snacks and favor fillers, assemble winter party favors, and gather craft station items into bins so setup is quick. - Day before:
Prep make‑ahead foods, bake cake layers if you will frost in the morning, and group decorations by room. Charge phones and cameras. - Party day:
Set up decorations first, then food and activity stations. Keep the schedule loose and leave plenty of time for kids to play in the “snowy” scene you created.
Creating a Magical Color Palette for Your Winter Wonderland
Color choices may be the biggest secret behind winter wonderland parties that look pulled together. When every item in the room follows the same basic palette, store‑bought bargains and homemade crafts all feel like part of one design.
Some favorite winter wonderland color palettes include:
- Classic: white and silver; icy blue with silver; white and gold for slightly older kids
- Soft and dreamy: white with blush and lavender; cream with champagne and blush
- Frosty forest: arctic blue with mint green and touches of white
Aim for one main color for about 60% of what guests see, a second for about 30%, and a third accent for small details. Carry those colors from your Layer7 Designs invitation to balloons, tableware, banners, and treats like blue marshmallows or white popcorn. Iridescent touches on cups, confetti, or snowflake decorations catch the light like real snow, and neutral basics such as white tablecloths or silver plates can be reused for future themes.
25 Budget-Friendly Winter Wonderland Party Ideas
This section gathers twenty‑five winter wonderland birthday party ideas that cover every part of the event. They work in apartments, houses, and small rental spaces, and you can mix and match to fit your child, space, and guest list.
Ideas 1-5: Show-Stopping Entrance and Focal Point Decorations
First impressions matter as guests walk in, so a few high‑impact decorations at the door or cake table make a big difference.
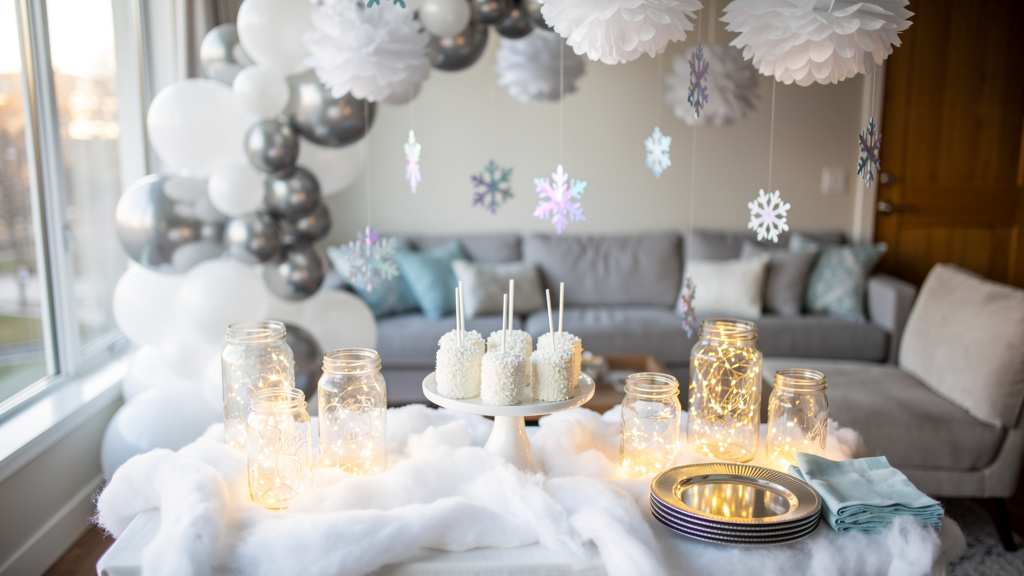
- Idea One: DIY Balloon Cascade Entrance — Frame a doorway or cake table with white, silver, and iridescent balloons plus one accent color, using tape or balloon strips; add a strand of fairy lights for extra sparkle for about $15–$25.
- Idea Two: Thrifted Chandelier Makeover — Paint a secondhand metal chandelier white, dust it with glitter (leaving wiring unused), and hang it with clear fishing line and ribbons in your party colors for a floating “ice crystal” effect.
- Idea Three: Faux Fur Tree Photo Nook — Place two small artificial trees beside the cake table, wrap their bases in white batting or faux fur, tuck them into baskets, and let kids pose between the “snow‑dusted” evergreens.
- Idea Four: DIY Winter Backdrop Wall — Hang a plain white sheet or shower curtain, tape on paper snowflakes and a few metallic stars, and drape string lights across the top to create an instant photo and dessert backdrop for around $15–$25.
- Idea Five: Cardboard Winter Castle Entrance — Collect large boxes from appliance stores, cut out towers and arches, paint everything white, and sprinkle with glitter or fake snow spray so kids can walk through a castle gate that later goes straight into recycling.
Ideas 6-10: Affordable Textural and Hanging Decorations
Textures, different heights, and gentle movement fill the room with a snowy feel without clutter.
- Idea Six: Pom-Pom Snowball Garlands — Use white yarn to make fluffy pom‑poms and string them across doorways, windows, or tables; a few dollars of yarn creates several soft “snowball” garlands.
- Idea Seven: Paper Snowflake Ceiling — Cut snowflakes from printer paper or coffee filters and hang them from the ceiling with clear thread at varied lengths so they sway and catch the light as guests move.
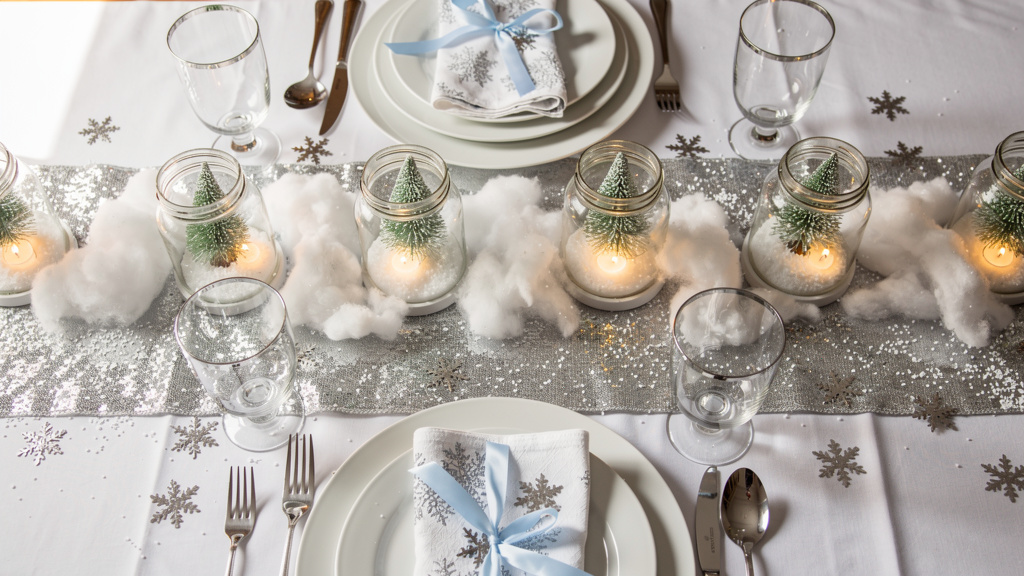
- Idea Eight: Glass Jar Snow Globes — Fill mason jars with epsom salt “snow,” tuck in a tiny tree or toy animal, and add a battery tea light; cluster three to five jars per table as glowing winter wonderland centerpieces.
- Idea Nine: Cotton Batting Snow Drifts — Stretch cotton batting along windowsills, mantels, or the center of your table, then tuck in ornaments, pinecones, or flameless candles to hide cords and create soft snowbanks.
- Idea Ten: Upcycled Plastic Icicles — Cut long pointed strips from rinsed clear plastic bottles, brush with a thin wash of silver or blue paint, and hang along windows to make shimmering icicles for almost no cost.
Ideas 11-15: Delicious and Themed Winter Treats
On‑theme food ties the whole winter birthday theme together and delights kids without needing a pro baker.
- Idea Eleven: Coconut Snow Cake Balls — Crumble a vanilla cake, mix with frosting, roll into balls, dip in melted white chocolate, and coat in coconut so they look like perfect little snowballs at only a few cents per treat.
- Idea Twelve: Pink or Blue Hot Cocoa Bar — Warm white hot chocolate in a slow cooker, tint it pink or blue with gel color, and set out toppings like mini marshmallows, crushed candy canes, whipped cream, and sprinkles so guests can build their own cozy drinks.
- Idea Thirteen: Snowflake Sandwich Platter — Use cookie cutters to make snowflake‑shaped sandwiches with simple fillings, then set them on white platters lightly dusted with powdered sugar that looks like snow.
- Idea Fourteen: Frosty Fruit Kabobs — Thread banana slices, marshmallows, and blueberries onto skewers, chill until firm, and stand them in clear glasses for a frosty‑looking, kid‑friendly snack.
- Idea Fifteen: Winter Wonderland Popcorn Mix — Toss popped popcorn with melted white chocolate, mini marshmallows, and silver sprinkles, let it set, then serve in clear cups or cones for easy snacking.
Ideas 16-20: Engaging Activities and Entertainment
Games and crafts keep energy focused and give kids something to do between cake and presents.
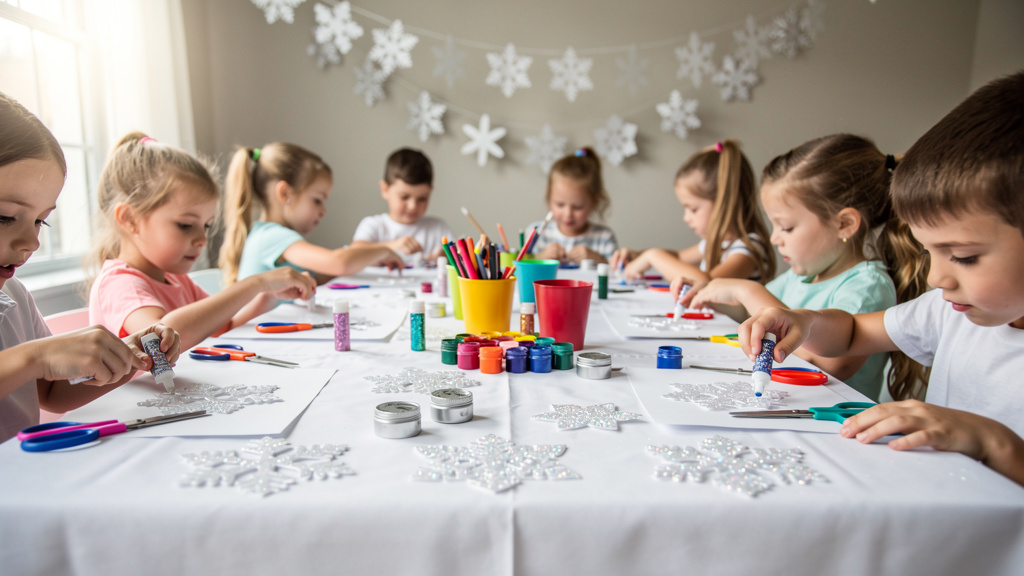
- Idea Sixteen: DIY Snowflake Craft Station — Set out paper, child‑safe scissors, stickers, and glitter glue; teach a simple folding method and hang finished snowflakes on string so the display grows during the party.
- Idea Seventeen: Indoor Snowball Toss — Make soft yarn pom‑pom “snowballs,” line up baskets or cardboard forts as targets, and let kids take turns tossing from different distances.
- Idea Eighteen: Decorate-Your-Own Snowman Cookies — Bake round sugar cookies ahead, then set out white icing, candy eyes, mini chocolate chips, and pretzel sticks so each child can create a snowman face to eat later.
- Idea Nineteen: Winter Scavenger Hunt — Hide picture or word clues around the house, place small prizes or stickers at a few stops, and finish at the cake table or favor basket; adjust the reading level to match your guests.
- Idea Twenty: Frozen Dance Freeze — Play winter songs or a Frozen playlist and have kids dance until the music stops, then freeze like ice statues; no extra supplies needed.
Ideas 21-25: Memorable and Affordable Party Favors
Favors feel special when kids can use, display, or play with them after the party, much like the memorable celebration ideas featured at historic venues hosting special winter events.
- Idea Twenty-One: DIY Hot Cocoa Kits — Layer cocoa mix, mini marshmallows, and a candy cane in small clear bags or jars, tie with ribbon in your party colors, and add a tag with simple instructions.
- Idea Twenty-Two: Personalized Snowflake Ornaments — Fill clear plastic ornaments with fake snow or glitter, tuck in a tiny photo of the birthday child, and write each guest’s name on the outside with a paint pen.
- Idea Twenty-Three: Winter-Themed Temporary Tattoos — Package snowflake, penguin, or polar bear tattoos in tiny envelopes so kids can apply them at the party or take them home.
- Idea Twenty-Four: Crafts as Favors — Let projects such as egg carton snowflake mobiles or decorated cookies serve as both activity and gift; display them to dry and then pack in simple paper bags.
- Idea Twenty-Five: “Melting Snowman” Slime Cups — Make white glitter slime, spoon into lidded cups, and include tiny black beads and orange clay noses in a separate bag; label each cup with a snowman face.
Step-by-Step: Coconut Snow Cake Balls Recipe

Coconut snow cake balls show up again and again in winter wonderland birthday party ideas. They look like mini snowballs, taste rich and sweet, and stack beautifully on dessert stands. You can make them days ahead, decorate them with kids, and even shape a snowman cake for the birthday child.
This version uses a simple vanilla cake mix, store‑bought frosting, white chocolate candy melts, and shredded coconut. One batch usually makes about twenty‑five cake balls, which fits well for smaller parties or as part of a larger dessert table, and the ingredients often total under fifteen dollars.
Making the Cake Base
- Bake a vanilla cake in a standard pan according to package directions and let it cool completely.
- Crumble the cake into fine crumbs in a large bowl using clean hands or a fork.
- Add a spoonful of vanilla frosting and mix, adding a bit more at a time until the mixture holds together when pressed without cracking or feeling sticky.
- Scoop even portions with a spoon or cookie scoop and roll into smooth balls between your palms.
- Place the balls on a parchment‑lined baking sheet and freeze for at least 1 hour; you can keep them frozen at this stage for up to a week.
Decorating Your Snow Cake Balls
- Melt white chocolate candy melts in a microwave‑safe bowl in short bursts, stirring between each. If it seems too thick, stir in a small spoon of melted coconut oil until it flows smoothly.
- Pour shredded coconut into a shallow dish and keep it close to the melted chocolate.
- Insert a lollipop stick, paper straw, or skewer partway into each chilled cake ball and dip into the melted chocolate, gently tapping off any excess.
- Immediately roll the coated ball in coconut so it is covered in “snow,” then place it back on the lined tray.
- Chill until the coating is firm. Arrange cake balls on a tiered stand, in a glass bowl filled with fake snow, or stack a few into a snowman with candy features. Store in the fridge for up to three days.
DIY Tutorial: Upcycled Egg Carton Snowflake Mobile
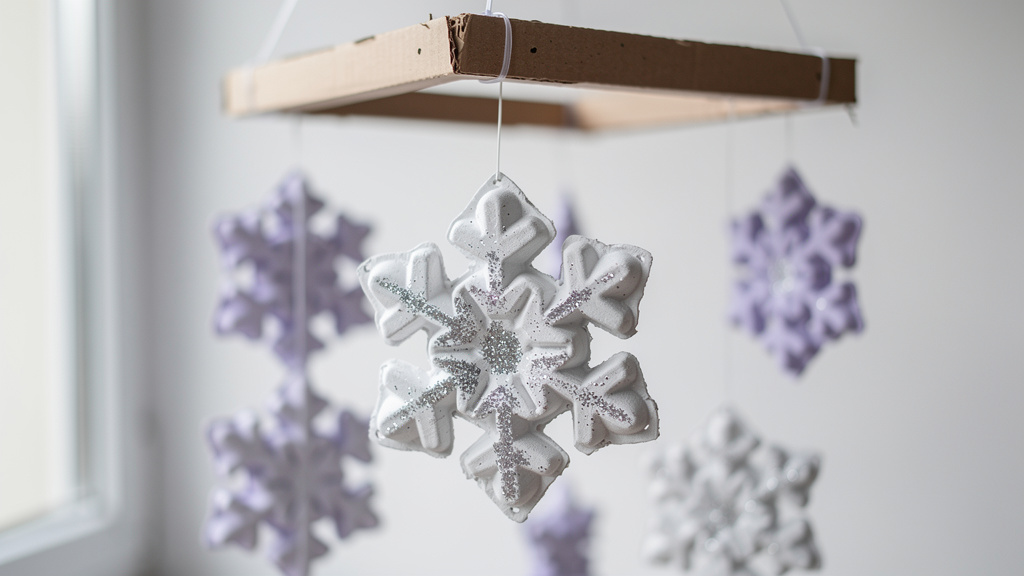
The upcycled egg carton snowflake mobile is one of the most charming budget‑friendly winter wonderland decorations in this guide. It turns a common recyclable into sparkling decor that looks whimsical above a party table or hanging in a child’s room afterward.
You can make several mobiles before the party as decor or set up the project as a craft station so each child takes home their own winter wonderland keepsake. Because the main material is empty paper egg cartons, supplies stay very affordable.
Materials and Preparation
Gather:
- Clean, dry paper egg cartons
- Acrylic paint in winter colors (white, pink, lavender, light blue)
- Glitter, sequins, or small beads
- Small paintbrushes and child‑safe scissors
- Clear string or fishing line
- A hole punch or large needle
If you plan to offer this craft at the party, ask friends and family to save cartons for a couple of weeks. For younger children, pre‑cut the individual egg cups from the cartons so they only need to paint and decorate.
Assembly Instructions
- Cut the individual cups from the egg cartons and trim rough edges so each looks a bit like a flower.
- For each cup, cut several slits down from the rim toward the center to form “arms,” then gently bend them outward into a snowflake shape.
- Let kids paint the pieces in winter colors and sprinkle glitter or add sequins while the paint is still wet. Lay them on wax paper or trays to dry completely.
- Punch a small hole near the tip of one arm on each snowflake. Thread clear string through and knot it, cutting strings in different lengths.
- For a hanger, cut a rectangle from the flat lid of an egg carton, punch holes along one long edge, and tie the other ends of the strings there so the flakes hang at mixed heights.
- Add one longer piece of string to the top center and hang the mobile in a window, above the dessert table, or over a reading corner. Single snowflakes also work as ornaments or favor tags.
Setting a Beautiful Winter Wonderland Tablescape
The main table is often the most photographed spot at any winter wonderland theme party. It holds the cake, centerpieces, and sometimes the birthday child, so a bit of attention here pays off. The good news is that a stylish winter table does not require fancy china or custom linens.
Think in layers from the bottom up: base cloth, runner, centerpieces, place settings, then small details. Mix what you already own, like plain white dishes or glass jars, with a few winter‑themed pieces for a look that feels planned but budget‑friendly. Your Layer7 Designs invitation doubles as a style guide for colors, fonts, and motifs while you shop.
Table Setting Essentials on a Budget
- Start with a simple base such as a white tablecloth or clean white sheet. Add a silver, blue, or iridescent runner and sprinkle epsom salt or tiny tufts of cotton along it to mimic snow.
- Use white dishes or plain white paper plates with themed napkins that show snowflakes or winter animals; clear plastic cups match any palette and look neat in photos.
- Wrap utensils in napkins and tie with thin ribbon or twine in your accent color for a pulled‑together feel.
- Make quick name cards from cardstock and a silver or blue pen, adding a tiny hand‑drawn snowflake.
- Set small winter party favors—tattoo packets, cocoa kits, or ornaments—at each place so the table feels full even before food arrives. Let your Layer7 Designs color scheme guide napkin and ribbon choices; you can echo similar looks with budget‑friendly tableware or collections from brands like Daydream Society.
Centerpiece Ideas That Wow
Centerpieces give your table height and focus without needing to be expensive. A tiered dessert stand piled with coconut snow cake balls creates an instant focal point that doubles as dessert. Another option is a cluster of battery candles surrounded by silver ornaments and soft cotton “snow.”
Small faux trees with mini lights, glass vases filled with white ornaments and tiny LED strands, or your jar snow globes also work well as winter wonderland centerpieces. Keep everything low enough that guests can see across the table and reuse decor from around the room so it all feels connected.
Personalized Winter Wonderland Invitations from Layer7 Designs
The invitation is the first glimpse guests get of your winter wonderland birthday party. It shares the details, but it also sets the mood with colors, wording, and art. A well‑designed digital invite can hint at snowflakes, cozy cocoa, or a Winter Onederland first birthday long before the party starts.
Printed invitations from a stationery shop often cost several dollars each. Layer7 Designs offers editable digital invitation templates that parents buy once (often around $5–$10) and send to as many guests as they like, which leaves more room in the budget for decor and food. Most templates work with Canva, so you can change colors, fonts, and wording without design training and even add a photo of your child in a winter outfit.
Why Digital Invitations Are Perfect for Budget-Friendly Parties
Digital invitations stretch the budget while still feeling thoughtful and polished. Parents purchase a Layer7 Designs template, customize it, and send it by text, email, or private message—no printing or postage required. Guests can reply in the same app where they receive the invite, which makes tracking RSVPs easier.
Because you can edit wording and details at any time, last‑minute schedule changes do not mean reprints. Layer7 Designs has options for sweet Winter Onederland first birthdays, classic snowflake parties, and Frozen‑inspired themes. Match your invitation colors to balloons, tableware, and banners so the party feels coordinated from the first message to the last photo.
Winter Wonderland Party Ideas by Age Group
A snowy theme works for babies, preschoolers, and big kids, but the details should fit the age of the birthday child. The best winter wonderland birthday party ideas feel fun, safe, and not too tiring for the guest of honor.
Shorter, photo‑friendly events work well for babies and toddlers, while school‑age kids enjoy more games and crafts. Party length, guest list size, and food choices should shift as children grow.
Winter Onederland: First Birthday Celebrations (Ages 1-2)
For a first or second birthday, keep things simple and focus on comfort and memories. Winter Onederland first birthday decorations often center on a high‑chair banner, a sweet cake table, and a cozy play area with blankets and a few favorite toys. Strong visuals for photos—like a fabric backdrop, a giant number one, or a single stunning balloon cluster—go a long way.
Activities stay gentle: a shallow bin of store‑bought fake snow or cloud dough for supervised sensory play, or a tiny handprint snowman craft with adult help. Aim for 90 minutes to two hours so nap schedules stay on track. Serve toddler‑friendly finger foods and remember most guests will be adults, so a hot cocoa bar and simple snacks are welcome.
Choose winter wonderland first birthday decorations without small loose pieces, and keep balloons and cords out of reach. Layer7 Designs offers Winter Onederland invitation templates with soft blues, whites, or blush tones that make it easy to match banners, plates, and toppers.
Preschool and Early Elementary (Ages 3-7)
Children ages three to seven love active play and simple crafts, which suits a winter wonderland theme perfectly. Plan two or three short activities—like the indoor snowball toss, Frozen Dance Freeze, and a snowflake craft table—with free play time between them. A winter scavenger hunt with picture clues or short rhymes works well for this age.
Food does not need to be fancy; presentation matters more than recipes. Snowman‑shaped sandwiches, cocoa with marshmallows, and fruit kabobs arranged like icy wands usually get more attention than a complex menu. Parties of two to three hours work best, and some guests may be dropped off, so make sure enough adults are available to supervise games and crafts. Many kids in this range care a lot about favors, so plan small but fun winter party favors they can show off later.
Money-Saving Shopping Strategies for Winter Party Supplies
Smart shopping stretches every dollar and keeps stress low. With a bit of planning, you can gather winter wonderland party decorations without racing from store to store at the last minute. Start by listing what you truly need, split into “must‑have” and “nice‑to‑have,” and shop your home first for white dishes, glass jars, blankets, and holiday decor that can work for one day.
Where to Find the Best Deals
- Dollar stores are great for tablecloths, clear cups, cake plates, balloons, ribbon, and basic craft supplies like foam boards and glitter. Neutral colors can work for several future parties.
- Post‑holiday sales in December and January often discount white lights, silver ornaments, and generic winter items by 50% or more.
- Online shops such as Amazon or Oriental Trading offer bulk packs of snowflake decorations, favor fillers, and craft kits at low per‑piece prices.
- Thrift stores can provide glass vases, white dishes, candle holders, and even old chandeliers ready for a coat of paint. Craft stores often run strong coupons on bigger items.
- Local buy‑nothing groups and parent groups sometimes have families happy to lend or pass along decor from their own winter parties. Pinecones and branches from your yard or park can be sprayed white for natural accents.
You can use a simple guide like this when planning:
| Guest Count | Typical Total Budget Range* |
|---|---|
| 10–15 | $75–$150 |
| 20–25 | $150–$250 |
Actual costs depend on your menu, decor choices, and how much you DIY.
Lighting and Ambiance: Creating the Winter Wonderland Glow
Lighting is a quiet hero of many winter wonderland birthday party ideas. The right glow makes homemade crafts sparkle and turns basic balloons into something dreamy. With short winter days, parties often happen in dim light, so a little planning helps photos and memories shine.
Affordable Lighting Options and Placement
String lights are flexible and low‑cost. Battery‑operated LED strands can run along walls, across mantels, through balloon garlands, or around faux trees without needing nearby outlets. Flameless candles bring cozy, flickering light to tables and windowsills without the risk of open flames around children.
You can tuck small LED strands into glass jars for instant lanterns or place clip‑on or puck lights on the floor to shine up backdrops or cardboard castles. During daytime parties, open curtains to invite in natural light, and at night, turn off harsh overhead lights so the softer glow from strings and candles stands out. Inexpensive snowflake projectors that cast moving patterns on walls or ceilings delight kids during dancing and games.
Conclusion
Winter wonderland birthday party ideas can feel grand in a child’s eyes even when they come from simple supplies and a thoughtful plan. A few big‑impact decorations, playful food, and warm lighting work together to turn an ordinary room into a snowy scene for an afternoon. The real heart of the party rests in laughter, frosting smudges, and tiny hands proudly holding crafts they made themselves.
This guide covered planning timelines, color palettes, decorations, treats, activities, favors, and DIY tutorials. With these ideas, you can mix store‑bought items and handmade touches in whatever balance fits your time and budget. Digital invitations from Layer7 Designs support that plan by offering affordable, customizable designs that match each child’s style and keep details organized.
“People will forget what you said, people will forget what you did, but people will never forget how you made them feel.”
— Maya Angelou
It is easy to worry about matching what you see online, but children mostly remember how loved and noticed they felt. A cardboard castle, a hot cocoa bar, and a living room full of friends often mean more than rented decor. Layer7 Designs stands ready with Winter Onederland, Frozen‑inspired, and classic snow‑themed invitation templates to start your planning with confidence.
FAQs
How Much Does It Cost to Throw a Winter Wonderland Birthday Party?
A small winter wonderland theme party for about 10–15 guests often fits within $75–$150. Medium parties of 20–25 guests may run $150–$250. Many families spend around $5–$10 on a Layer7 Designs digital invitation template, $30–$60 on decorations, $40–$80 on food, and $20–$40 on activities and favors, depending on how much they make at home versus buy ready‑made.
What Are the Best Colors for a Winter Wonderland Party?
Classic winter wonderland palettes include white, silver, icy blue, and clear “crystal” accents. Modern twists mix white with soft pink and purple, cream with champagne gold, or arctic blue with mint green. Iridescent and metallic details help everything shimmer. Many parents choose colors that match their Layer7 Designs invitation so the whole party feels coordinated.
Can I Do a Winter Wonderland Party Indoors?
Yes, an indoor winter birthday theme works beautifully and keeps guests warm and dry. Focus on decorations that change the feel of the room, such as hanging paper snowflakes, clusters of white balloons, cotton batting “snow,” and simple winter backdrops. Add string lights, flameless candles, and a few DIY projects like jar snow globes to bring in cozy sparkle. Indoor games, craft tables, and a hot cocoa bar all fit well in a living room or community room.
What Activities Work Best for a Winter Wonderland Birthday Party?
Great activities include snowflake making at a craft station, cookie decorating, DIY snow globes or egg carton snowflake mobiles, and simple “snow science” experiments. Active play ideas such as an indoor snowball toss, Frozen Dance Freeze, or a winter scavenger hunt keep kids moving. Quiet options like winter story time or coloring pages with snow scenes give younger guests a break. Plan two or three main activities instead of packing the schedule too tightly, and let some crafts double as winter party favors.
When Should I Send Out Winter Wonderland Party Invitations?
For most winter birthdays, send invitations about three to four weeks before the party. If your event falls close to major holidays in November or December, send them four to six weeks ahead since families often have full calendars. Digital invitations from Layer7 Designs can go out the same day you buy and edit them, which helps when plans come together quickly. Ask guests to reply at least one week before the party so you can plan food, seating, and favors with a clear headcount.
What Food Should I Serve at a Winter Wonderland Party?
Serve a mix of themed treats and simple, filling options. Coconut snow cake balls, snowflake‑shaped cookies, white chocolate–dipped pretzels, and popcorn mixes with white chocolate all echo the snowy theme. Warm drinks like a hot cocoa bar feel extra cozy. Include at least one or two allergy‑aware choices such as fruit trays or plain popcorn. Display food on white dishes, cake stands, and trays sprinkled with powdered sugar or cotton “snow” to tie everything into your winter wonderland scene.
- Why I Fired QuickBooks: How I Manage My Etsy Shop Finances for $35 (And You Can Too) - January 21, 2026
- Party Entertainment Ideas for 5 Year Olds Kids Love - January 5, 2026
- 25 Magical Winter Wonderland Birthday Party Ideas - December 23, 2025